

Why You Should Diagnose Before You Fix a Player Piano
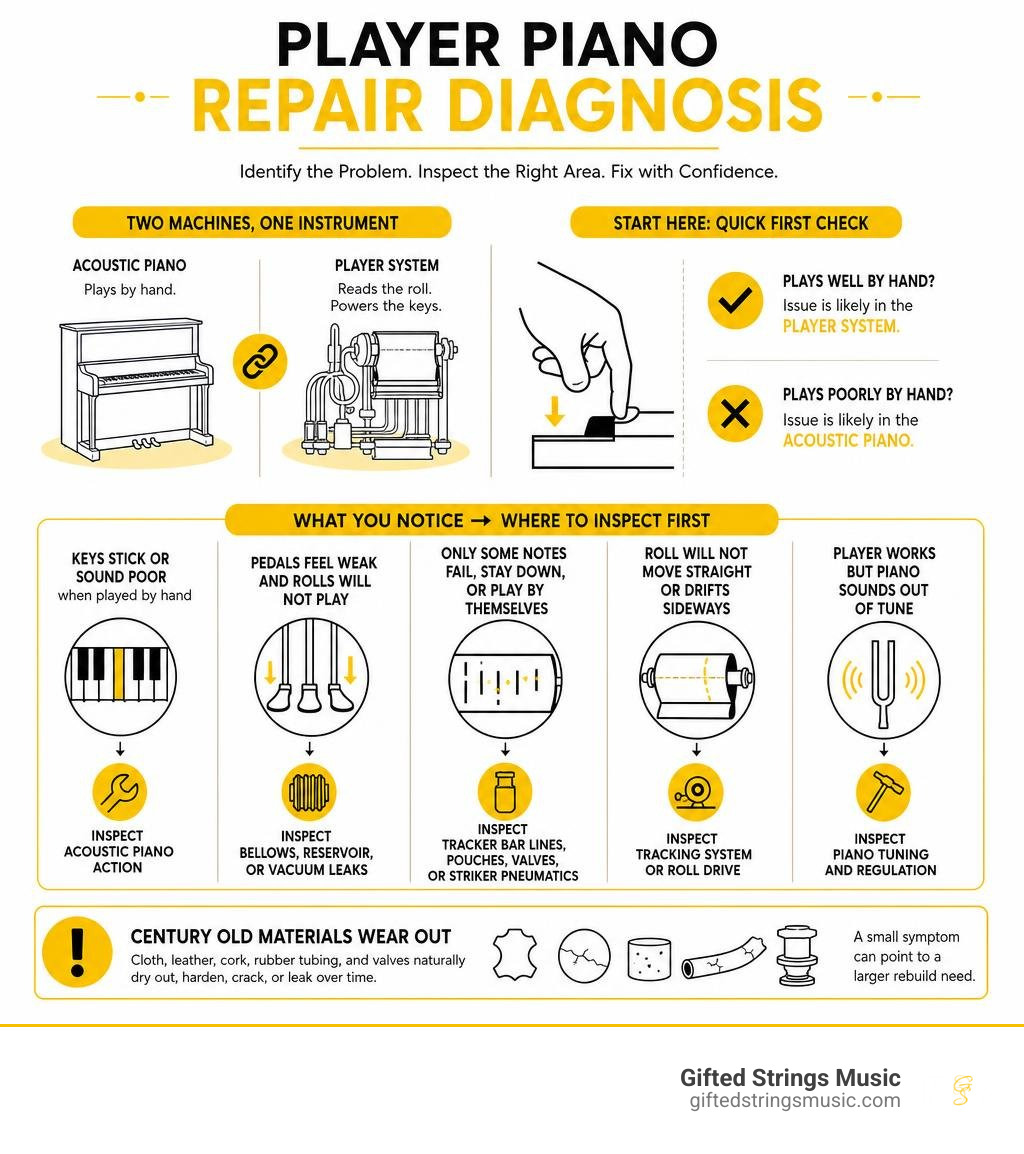
To fix player piano problems, first separate the regular piano from the player mechanism: if it plays normally by hand but not from a paper roll, the fault is usually in the pneumatic system, not the keys or hammers.
| What you notice | Most likely area to inspect first |
|---|---|
| Keys stick or notes sound poor when played by hand | Acoustic piano action |
| Pedals feel weak and rolls will not play | Bellows, reservoir, or vacuum leaks |
| Only some notes fail, stay down, or play by themselves | Tracker bar lines, pouches, valves, or striker pneumatics |
| Roll will not move straight or drifts sideways | Tracking system or roll drive |
| Player works but piano sounds out of tune | Piano tuning and action regulation |
Most roll-type player pianos are now around a century old. Their cloth, leather, cork, rubber tubing, and valve materials naturally dry out, harden, crack, or leak. That does not always mean the instrument is beyond saving. It does mean that a small symptom can point to a larger rebuild need.
A player piano is really two linked machines: an acoustic piano that must play well by hand, and a vacuum-powered system that reads holes in a paper roll to press its keys. The player unit cannot make an unregulated or poorly tuned piano perform better than it does under a pianist’s hands.
This guide helps Long Island owners, families, and school music programs identify safe DIY maintenance, understand when a repair calls for a specialist, and protect the value of a cherished instrument before making irreversible changes.
How to Diagnose and Fix Player Piano Mechanical Failures
When you set out to fix player piano assemblies, understanding how the pneumatic stack interacts with the piano action is half the battle. Peak production in the 1920s saw over half of all American pianos built with internal player units. Today, virtually all unrestored player pianos are 80 to 100 years old. Over time, original leather pouches stiffen, bellows cloth rots, and vulcanized rubber hoses turn brittle enough to snap between your fingertips.
Before picking up a screwdriver, determine whether an issue stems from the acoustic piano action or the pneumatic player stack. If you press a piano key by hand and the hammer strikes the string smoothly, returns cleanly, and dampers damp correctly, the piano action is functional. If the key stays stuck down or feels sluggish under manual touch, the cause might be dislodged hammer return springs or warped key wooden parts rather than a pneumatic fault.
When you pump the foot treadles and feel no resistance—as if pumping air into an empty room—you are dealing with systemic vacuum loss. Missing original parts or defunct manufacturer components (such as obsolete brand-specific pneumatic valves) require custom wood fabrication or adaptable replacements, making systematic diagnostics critical.
Step-by-Step Methods to Fix Player Piano Pneumatic Air Leaks
Vacuum leaks are the single biggest cause of automated playback failure. In a healthy system, air suction creates a vacuum chamber inside the stack. When a hole in the music roll uncovers a port on the tracker bar, atmospheric air rushes down the line, lifts a flexible leather pouch, triggers a valve, and collapses a small striker pneumatic to actuate the key. If air leaks anywhere along that line, atmospheric pressure cannot build the differential pressure needed to move the pneumatic valve.
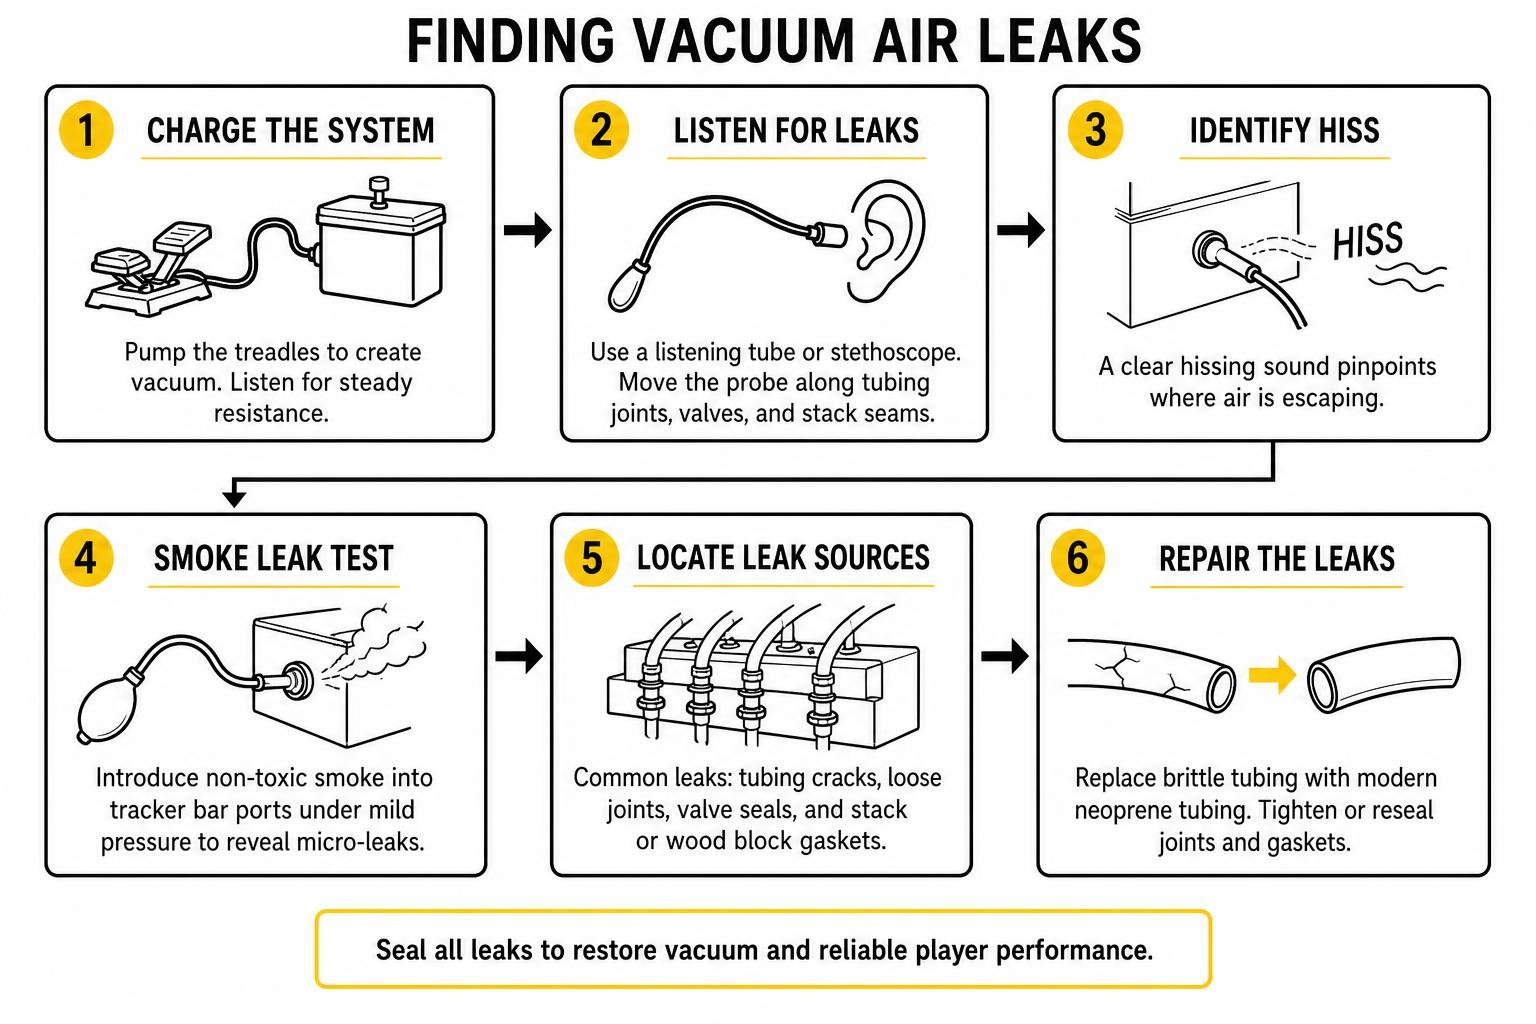
Finding hidden air leaks requires systematic tracing:
- Acoustic Tracing with a Listening Tube: Place one end of a flexible 3-foot rubber tube or stethoscope to your ear while the vacuum system is charged (or while gently pumping). Trace the other end along internal tubing joints, valve seals, and stack seams. A distinct “hissing” sound pinpointing a leak will immediately stand out.
- Smoke Leak Testing: Gently blowing non-toxic smoke into tracker bar ports while under mild pressure allows you to visually identify micro-cracks in tubing or failing wood block gaskets where smoke escapes.
- Replacing Brittle Tubing: Antique lead tubing oxidizes and forms powdery internal blockages, while original rubber hoses harden and split. Strip away cracked tubing and replace it with modern high-grade neoprene tubing. Neoprene remains flexible across seasonal humidity changes without dry-rotting.
- Gasket Selection: Cut replacement gaskets between vacuum chest sections using thin, airtight zephyr skin or dedicated pneumatic leather rather than modern synthetic foam.
Essential Tools, Traditional Hot Hide Glue, and Reversibility Rules
Restoring a player piano is an exercise in historical preservation. The cardinal standard among piano restorers is the Reversibility Rule: never use an adhesive or sealant that cannot be undone without destroying vintage wood fibers.
- Hot Hide Glue: The gold standard for bonding wood, leather, and pneumatic cloth. Prepared by soaking hide glue granules in water and heating them to exactly 145°F (63°C), hot hide glue creates a permanent yet reversible bond. If a future technician needs to open a pneumatic chamber 50 years from now, applying controlled heat and moisture allows the glue to release cleanly without splitting original wood boards.
- Burnt Shellac: Used exclusively for sealing metal fittings to wood.
- Dry Graphite Powder: The only acceptable lubricant for sliding wooden parts, air motor slides, and transmission gears. Never spray liquid oils or WD-40 onto a piano action.
- Avoid Silicone and Polyurethane: Modern white glues, silicone caulking, epoxy, and polyurethane foams are a death sentence for antique player mechanisms. Modern polyurethane pouches degrade into crumbly debris within 30 years, whereas traditional leather pouches held with hide glue routinely last nearly a century. Synthetic glues fuse delicate wooden valve blocks permanently, rendering future adjustments impossible.
Cleaning and Servicing the Tracker Bar
The tracker bar is the nickel- or brass-plated bar that reads the music roll. Containing 88 or more tiny ports, its channels easily collect paper dust, lint, and rogue cobwebs.
To maintain optimal response, clean the tracker bar regularly using a hand-operated tracker bar suction pump. Never blow compressed air into tracker bar ports; doing so forces decades of trapped paper dust straight down into the delicate pouch wells and bleed cups inside the stack.
For oxidized brass or nickel tracker bars, polish the face lightly with fine 0000 steel wool to ensure paper rolls slide effortlessly without drag. If individual notes fail to play, check the tiny bleed holes near the valve chest. These microscopic ports clear vacuum pressure after a note perforation passes. Use a fine pin or wire to clear paper lint from clogged bleed holes so valves reset quickly. Finally, inspect pneumatic tracking sensors on the outer edges of the tracker bar to make sure roll alignment fingers shift the take-up spool smoothly left and right.
For a deeper look into traditional restoration workflows, review this comprehensive piano player step-by-step restoration guide.
Rebuilding Bellows, Striker Pneumatics, and Valve Assemblies
Rebuilding the lower suction unit (the treadle bellows and reservoir) along with the individual striker pneumatics demands careful attention to detail.
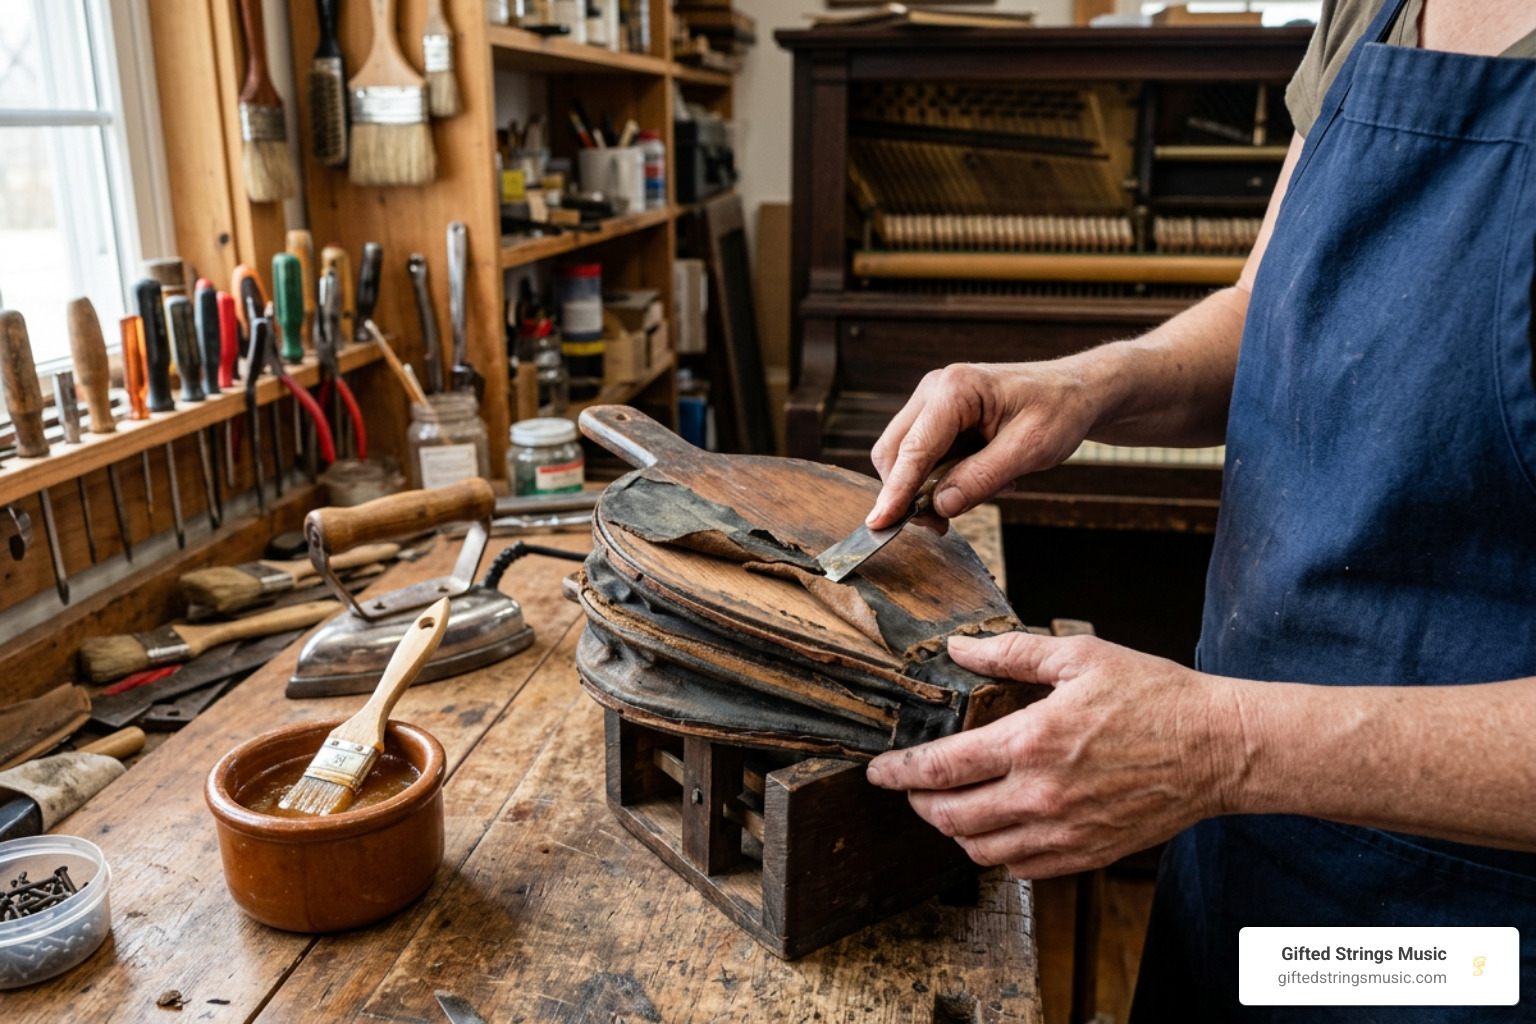
To recover a leaking pneumatic board or bellows:
- Remove Old Fabric: Apply controlled heat along the glued edges of the moveable and stationary boards to soften old hide glue, then scrape away degraded cloth and leather.
- Surface Preparation: Clean wood surfaces thoroughly, filling splits with period-appropriate wood splints set with hide glue.
- Hinge and Cloth Fitting: Re-hinge moveable boards using linen or leather strips. Cut replacement pneumatic cloth or zephyr skin precisely. Use the “hinge method,” applying hot hide glue at 145°F and ironing seams gently with a warm iron to melt glue deeper into fabric fibers.
- Gusset Reinforcement: Seal corner folds with supple leather gussets to prevent air leaks at stress points.
- Valve Refacing and Calibration: Clean or replace leather valve faces, ensuring brass valve seats are polished smooth with 0000 steel wool. Set valve stem travel precisely—typically .040 inches of travel with a 1/16-inch clearance between valve disc and pouch.
- Drop Testing: Test rebuilt individual pneumatics by sealing intake ports and conducting a drop test to confirm air-tight seals before reinstalling the stack.
The 7 Golden Rules of Player Piano Restoration
- Rule 1: Always Prioritize Reversibility: Use only hot hide glue for wood, leather, and cloth connections, and burnt shellac for metal-to-wood seals.
- Rule 2: Respect Original Materials: Choose fine pneumatic leather, zephyr skin, and high-grade wool felt instead of modern synthetic foams or silicones.
- Rule 3: Clean, Don’t Blow: Vacuum tracker bar ports and pouch wells; never blast compressed air into internal channels.
- Rule 4: Keep Fasteners Historic: Use traditional slot-head brass and steel screws; match original thread gauges rather than forcing modern drywall screws into vintage wood.
- Rule 5: Maintain Valve Tolerances: Set precise valve stem travel (generally .040 inches) and maintain pouch clearances to ensure snappy repetition.
- Rule 6: Restore the Piano First: Never rebuild a player mechanism without regulating and tuning the underlying acoustic piano action; the unit can only play as well as the piano itself.
- Rule 7: Document and Date: Sign and date your restoration work inside the casing to maintain historical continuity for future technicians.
Troubleshooting Notes That Fail or Won’t Turn Off
One of the most frequent support requests involves notes that stick “ON” (ciphering) or fail to strike entirely.
When notes draw down automatically the moment you pump the treadles, low winter humidity is often to blame. Dry air causes wood sections to shrink and dry leather pouches to pull tight, holding primary intake valves off their seats. Pumping vigorously with a dedicated tracker bar pump can sometimes pull shrunken pouches back into position.
Other common causes include trapped paper dust on valve seats, loose leather valve facings on valve stems, or cracked 3-inch rubber connecting hoses on transposing tracker bars. In double-valve systems, primary intake valves deteriorate faster than exhaust valves because intake valves are constantly exposed to ambient, un-filtered air.
Technicians rely on specialized diagnostic rolls to systematically test operating characteristics. If you are troubleshooting stubborn pneumatic issues, follow this detailed Player-Care test roll guide to evaluate vacuum capacity and scale uniformity. For notes that refuse to turn off, consult this technical Player-Care guide on stuck notes for detailed valve-seating adjustments.
DIY vs. Professional Restoration, Tuning, and Modern Upgrades
Deciding whether to fix player piano systems yourself or hire a professional comes down to scope. Basic maintenance—like replacing external rubber tubing, clearing tracker bar lint, or re-attaching loose treadle straps—is well within reach of patient DIY enthusiasts. However, a full pneumatic stack rebuild involves around 10,000 individual moving parts, hundreds of valve clearances, and delicate leather pouch installations.
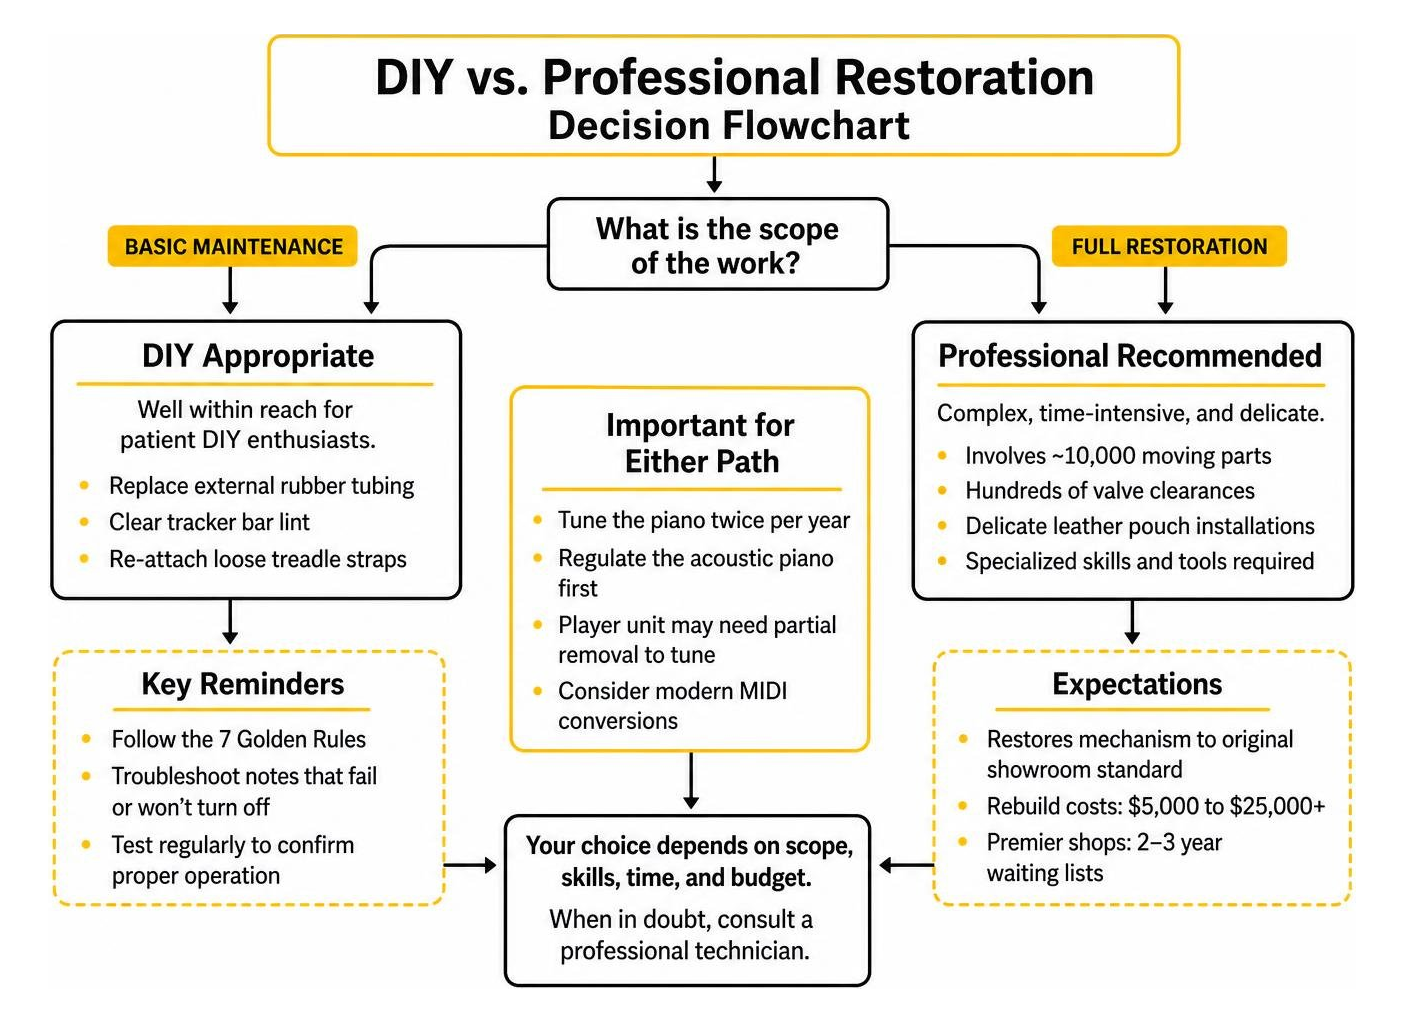
A high-quality professional restoration brings the mechanism back to original showroom standard. Rebuilding costs typically range from $5,000 to over $25,000, depending on cabinet condition and action wear. Due to the specialized nature of this work, premier restoration shops often maintain 2- to 3-year waiting lists.
Standard piano tuning must be performed twice per year regardless of how frequently the player mechanism is used. Tuning a player piano requires extra care: in many vintage upright models, the upper pneumatic stack sits directly in front of the pinblock and tuning pins, requiring partial removal of the player unit just to fit a tuning hammer onto the pins.
How to Fix Player Piano Issues with Modern MIDI Conversions
When vintage pneumatic components are severely damaged, water-stained, or missing, an electromechanical “restomod” conversion offers an exciting alternative. Rather than scrapping a non-functional instrument, modern builders mount discrete 12V solenoids beneath key paddles to actuate keys electronically while preserving the physical acoustic piano.
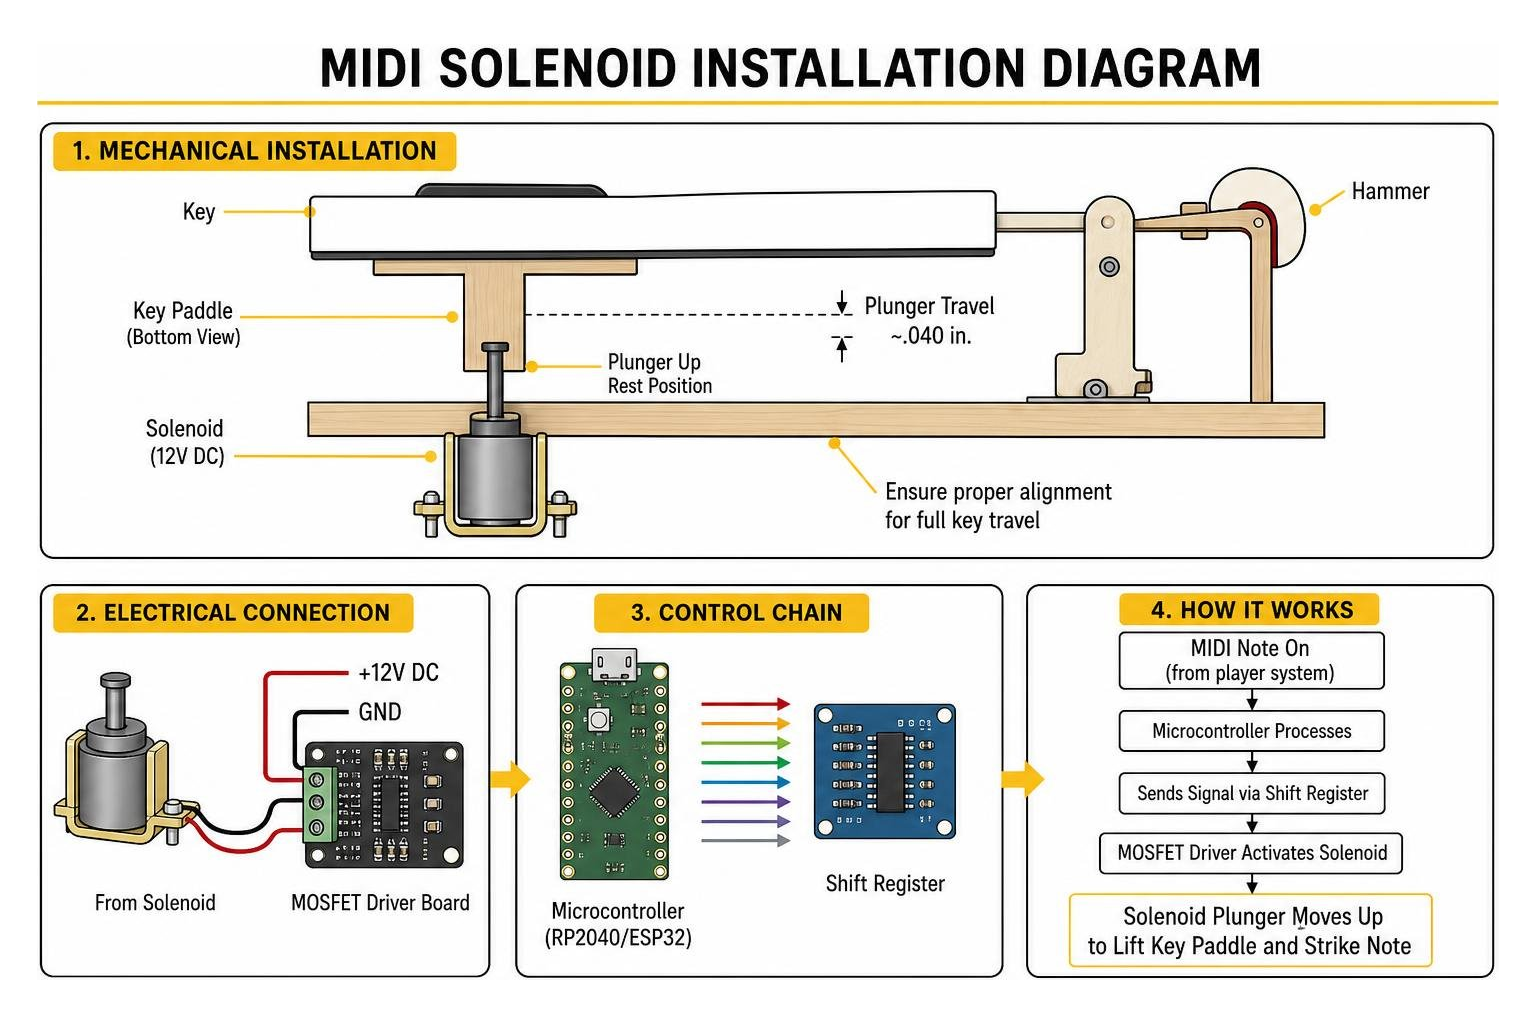
Modern conversions utilize microcontrollers like the Raspberry Pi Pico (RP2040) or ESP32 paired with shift registers and MOSFET driver boards to control all 88 notes.
Key technical considerations include:
- Pulse Staggering: Firing multiple solenoids simultaneously during complex chords creates massive power supply current spikes. Firmware pulse staggering offsets note signals by micro-milliseconds, preventing power drops while remaining imperceptible to the human ear.
- PWM Velocity Control: Raw MIDI signals sound stiff and mechanical if mapped directly to solenoid power. Microcontroller pulse-width modulation (PWM) adjusts key strike velocity, softening dynamic blows for expressive, human-like playback.
- Machine Learning Calibration: Advanced projects incorporate decibel-meter data and machine learning models to map non-linear key strike force across individual keys, compensating for physical variations in key weight and hammer resistance.
To see an inspiring example of a modern electromechanical conversion, check out this Hackaday player piano MIDI restomod feature. You can also review additional technical writeups on this restomod project breakdown or inspect open-source dynamic software firmware on this machine learning player piano repository.
Frequently Asked Questions About Player Piano Repair
How do I know if the problem is in the acoustic piano action or the pneumatic system?
Play every key manually by hand with the player unit disengaged. If keys sound clear, move freely, and return promptly, your acoustic piano action is in working order, pointing to a pneumatic vacuum issue. Conversely, if keys stick, feel spongy, or fail to strike strings during manual play, you must address mechanical action regulation, tight key bushings, or dislodged hammer return springs first.
Is restoring an unrestored 80-year-old player piano worth the cost?
From a purely financial resale perspective, un-restored player pianos usually hold low market value due to the high cost of rebuilding. However, from a historical, sentimental, and musical standpoint, a properly executed restoration using traditional materials can last up to 80 years. If the acoustic piano boasts a solid pinblock, soundboard, and high-grade cabinetry, full restoration creates a cherished family heirloom.
Does the player mechanism affect standard acoustic piano tuning?
The player mechanism does not alter string tension or physical tuning stability directly. However, the pneumatic stack physically obstructs access to tuning pins. Technicians must carefully unbolt or tilt the upper player stack out of the way during tuning. Because player pianos place higher physical demands on the action during automated performance, maintaining a regular schedule of tuning twice per year keeps the instrument sounding its best.
Conclusion
Restoring a vintage roll player piano connects us directly to a golden era of American musical engineering. Whether you are clearing clogged tracker bar ports, re-tubing leaky vacuum lines with modern neoprene, or attempting a complete hot hide glue recovery of striker pneumatics, preserving these mechanical marvels requires patience, precision, and respect for period-authentic craftsmanship.
At Gifted Strings Music, we bring over a decade of dedicated instrument care experience to homes, schools, and concert venues across Long Island, NY. Fully insured and trusted by renowned musicians, our team offers expert tuning, action regulation, repair, and full restoration services tailored to your instrument’s needs.
Ready to bring your cherished instrument back to vibrant life? Contact our team today for Professional Piano Restoration Services and schedule your personalized evaluation!